
- Adding Items to a Rental PO
- Editing Line Items on a Rental PO
- The "Line Mute" (LM) Box
- Drop Modes (Auto, Insert, and Add)
- Line Item Options Menu
- Workbench Menu Options
Adding Items to a Rental PO
- Create or open the Rental PO you want to edit.
- Click on the Details tab at the bottom of the page.
- Open your inventory tree from the left-hand Resource Browser menu.
- Click and drag the inventory item from the inventory tree to the Rental PO.
- Enter the Quantity in the popup and click OK.
You can also add items to a Rental PO from the Search function in the Resource Browser. Search for an inventory item, then drag and drop it into the Rental PO.
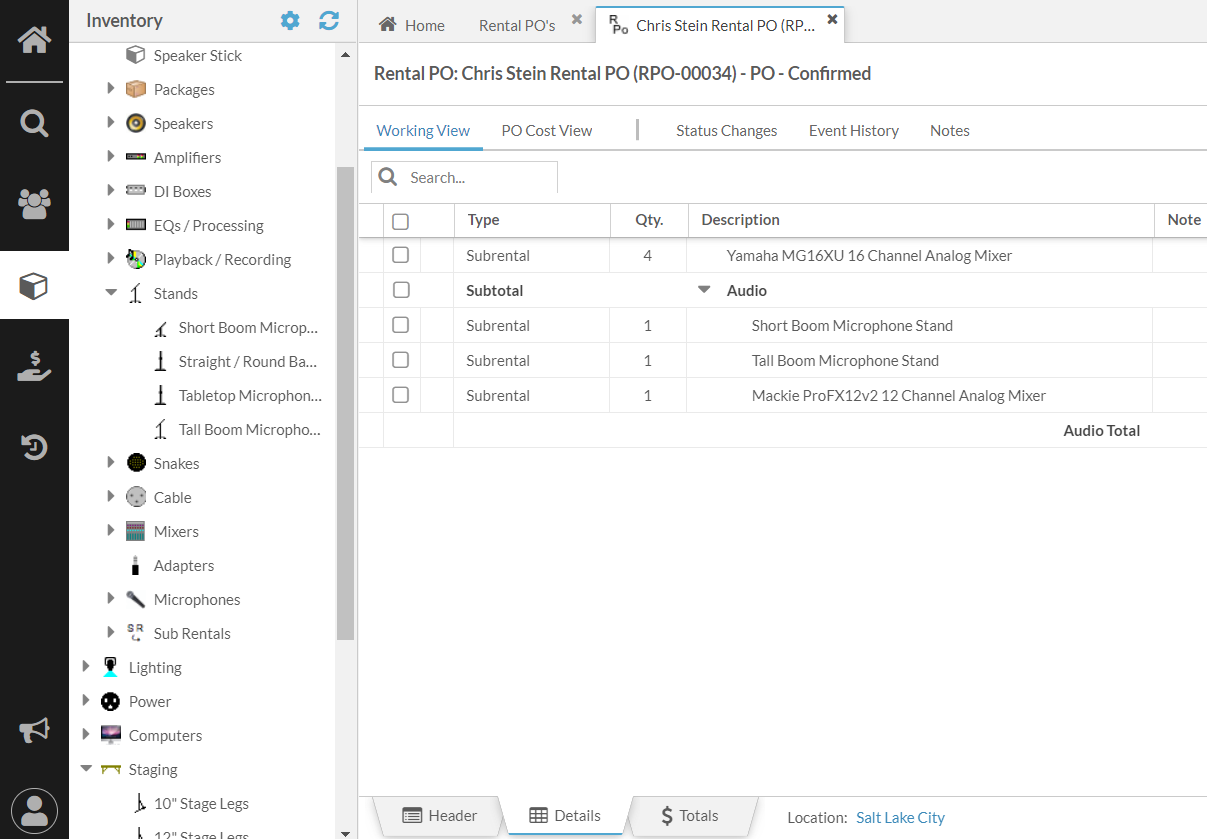
Editing Line Items on a Rental PO
After an item has been added to the Rental PO, you can edit most of the information for the item, including quantity, notes, rate, and pricing. Click in each field to edit. The field will either turn into a text editable field or a drop down menu. Make the changes, then click out of the field and the changes will be saved.
The "Line Mute" (LM) Box
Checking the Line Mute (LM) box will make the line item not appear on the PDF copy of the Rental PO.
Drop Modes (Auto, Insert, and Add)
There are three different drop modes when building a Rental PO: Auto, Insert, and Add. You can select which drop mode to use from the menu at the bottom of the Rental PO header.
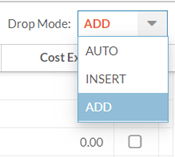
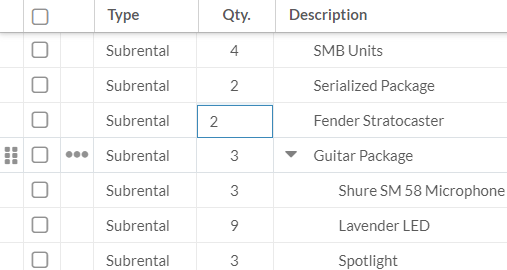
Auto drop mode: When you drag and drop an item into the Rental PO in Auto drop mode, it will automatically sort into a subtotal. Furthermore, each item will be sorted in the Rental PO in the same order that the items are sorted in the inventory tree. Remember, you can sort folders and inventory items in the inventory tree any way you want. The folders and items at the top of the inventory tree will appear first on a Rental PO when you are in Auto drop mode.
Insert drop mode: When you drag and drop an item into the Rental PO in Insert drop mode, you can place the item wherever you want on the Rental PO. This includes into any existing subtotal, or outside of a subtotal. A thick black line designates where the item will be dropped into the Rental PO.
Add drop mode: When you drag and drop an item into the Rental PO in Add sort mode, the item will automatically be sorted to the very bottom of the Rental PO.
Notice that when you are in Insert or Add mode, a few new icons appear, including Add Note Line, Add Misc Line, and Add Blank Line to the Rental PO.
You can move any line item on a Rental PO by clicking the icon to drag and drop on the far left-hand side of the line. A thick black line will indicate where the line item will be dropped.
Line Item Options Menu
Each line item on the Rental PO has an Options Menu with some helpful tools. Click on the Options Menu icon to see the following options:
- Open Item – Will open the inventory information screen for the item.
- Schedule – Will open the detailed schedule for the item.
- Conflicts - Not yet available in Flex5.
- Suggestions – Will open the suggestions window, allowing you to choose any suggestions that have been applied to the item.
- Choose Serialized Unit – Allows you to choose a specific serialized unit to be sent for the line item.
- Link Manager - Allows you to view the upstream and/or downstream links for a line item.
- Copy Line – Will copy the line. After a line has been copied, clicking on another Options Menu icon will show the Paste Line option. Alternatively, you can use the Paste Copied Lines option in the Workbench Menu.
- Delete Line – Delete the line item from the Rental PO.
- Add Note Line
- Add Misc Line
- Add Blank Line
Workbench Menu Options
At the top of the Workbench Menu, you will see the Elements icon which will display the project tree. The project tree will show you all of the parent and child elements that are associated with this Rental PO like a parent Event Folder or Quote.
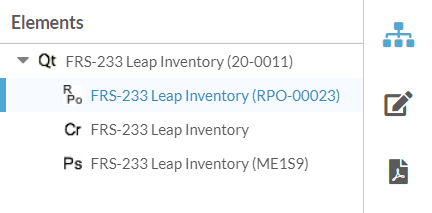
You can double click on any of the parent or child elements to open them.
The second icon in the Workbench Menu is the Modify icon. The following options are available under the Modify menu:
- Edit Header – Will open the edit window that was opened when you created the Rental PO.
- Copy Selected Lines – Will allow you to copy multiple selected lines.
- Delete Selected Lines – Will allow you to delete multiple selected lines.
- Create Subtotal – Will allow you to create a custom subtotal in which items can be placed.
- Bulk Edit - Will allow you to edit multiple items at once.
- Reset Price – Will allow you to reset the default price of line items that have been manually changed. (Select a line item or multiple line items, then choose the Reset Price option.)
- Copy Rental PO – Will allow you to copy the entire Rental PO, with the option to copy the whole project tree, change dates, and reset workflow.
- Move Rental PO – Will allow you to move the Rental PO into a parent folder.
- Delete Rental PO – Will allow you to delete the entire Rental PO.
The next category is Reports, where you can generate a PDF copy of the Rental PO. By default, only the Generate PDF option is available in the category. On the upper right-hand side of the Rental PO tab, you can use the Send to Vendor option, which will send an email to the vendor with a PDF of the Rental PO attached.
Logistics will display options to generate or update various documentation that can be utilized to aid in logistics processes.
Financials displays in proper context, applicable options to preform tasks such as entering payments on a financial document.
The Workflow category will show all of the workflow options that are associated with the current status of the Rental PO. For example, when the Rental PO is in PO - Tentative status, the Workflow category might show the option to submit the PO for approval. When you change statuses, the workflow options will change to reflect the new options associated with the status.
The Add Child Elements category allows you to quickly add new child elements to the Purchase PO, like a Document.