- Overview
- Using the Workflow to Export to QuickBooks Online
- Exporting Other Elements to QuickBooks Online
Overview
Invoices are sent from Flex to QuickBooks Online using the element workflow. If your Flex account has QuickBooks Online integration enabled, then the workflow for your main invoice element will be set to allow exporting to QuickBooks Online.
Using the Workflow to Export to QuickBooks Online
- Open the Invoice that you want to export to QuickBooks Online
- In the right-hand menu, click the Workflow section
- Click Export to QuickBooks
As mentioned above, because Flex is highly customizable, the workflow action to export to QuickBooks Online might be named something different in your system. If you don't see a workflow option to export to QuickBooks, speak to your system administrator.
The Invoice tab will be inactive as the Invoice exports to QuickBooks Online. But you can still click on any other Flex tab and continue working while the export is in progress.
Exporting Other Elements to QuickBooks Online
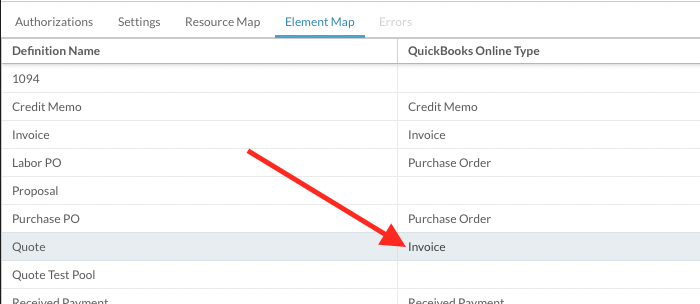
Flex is set up by default to export Invoice elements to QuickBooks Online. If you want to export other element types to QuickBooks Online (like a Quote, or a custom element you have created), you can set that up in QuickBooks Online Integration Settings.
- On the main menu, click Integrations
- Click QuickBooks Online
- Click the Element Map tab
- Find the name of the element that you want to export to QuickBooks online
- Set the QuickBooks Online Type to "Invoice"

You will also have to adjust the Workflow settings for the element. For example, the Quote element Workflow does not have any actions to export to QuickBooks Online by default. You will have to create a new workflow action, and potentially create new statuses, states, and adjust other workflow settings for the element.
The Workflow article is a good place to start if you are unfamiliar with workflow states, actions, and jobs.
You can also contact Flex Support for additional help.